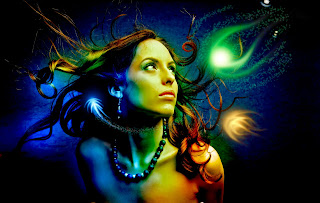
So today I have been creating an orb effect. It's rather simple when you know how it's done.
To do this, I first used the brush tool, turned down the hardness to 0% which gave it a faded effect around the edges of the paint, then turned the strength to 85%. I then layered more colour over the top of the first , brightening the colour each time and decreasing the size of the brush.
After that, I moved onto the smudge tool. This allowed my different layers of colour paint to be smudged along, which gave the orb it's tail. Going over the white center, smudging down the colours to the center of the tail to add to the effect. With this technique I also used to it to create two wings on the sides.
To help keep track of my editing and to undo any mistakes, I used the history palette.
So far I am very pleased with my work, it's a great effect and easy to accomplish
I made three orbs overall. Blue, green and finally orange (flame). All using the same techniques
After I finished the orbs I then moved onto lighting effects. This involved masking certain areas on the woman where I wanted to change the colour, this was done around areas I believe the glow from the orb would shine on. After I finished masking, I then went to adjustments, and then to colour balance. This allowed me to change the colour in those areas.
This is my finished piece
Overall I am very pleased with my work, I learned a great deal and it was also very enjoyable.... Which isn't something you always feel when doing work.
I am most pleased with how well the orbs and lighting effects representing it, work so well together.


No comments:
Post a Comment